Logging Inner Exceptions with NLog

Most of the time while logging exceptions, we log ex.Message or ex.Message + ex.StackTrace. However, in this way, inner exceptions are left out.

NLog provides its own way of logging exceptions and it can log inner exceptions up to any level we want. Below is an example of logging exceptions with NLog.

In your code just log the exception object:

try
{
    ProcessItems();
}
catch (Exception ex)
{
    logger.Error(ex, “Your exception message here”);
}

In NLog.config, configure the layout like this:

<target xsi:type="File"
  name="f"
  fileName="${basedir}/logs/MyLogFile.log"
  layout="${longdate} ${uppercase:${level}} ${message} ${exception:format=Message,StackTrace,Data:maxInnerExceptionLevel=10}"
/>

If you want, you can also add archiving:

<target xsi:type="File"
  name="f"
  fileName="${basedir}/logs/MyLogFile.log"
  layout="${longdate} ${uppercase:${level}} ${message} ${exception:format=Message,StackTrace,Data:maxInnerExceptionLevel=10}"
  archiveEvery="Day"
  archiveNumbering = "Date"
  archiveFileName="${basedir}/logs/MyLogFile.{#}.log"
  archiveDateFormat="yyyyMMddHHmm"
  maxArchiveFiles="15"
/>

The above configuration will generate log file with a particular name inside logs folder. However, you can also append date time in log file name.

The result will be like this in the log file:

2018-11-29 10:11:34.4148 ERROR System.Exception: This is the message coming from outer exception ---> System.Net.WebException: The remote name could not be resolved: 'test-server'
   at System.Net.HttpWebRequest.GetRequestStream(TransportContext& context)
   at System.Net.HttpWebRequest.GetRequestStream()
   at Microsoft.SharePoint.Client.SPWebRequestExecutor.GetRequestStream()
   at Microsoft.SharePoint.Client.ClientContext.GetFormDigestInfoPrivate()
   at Microsoft.SharePoint.Client.ClientContext.EnsureFormDigest()
   at Microsoft.SharePoint.Client.ClientContext.ExecuteQuery()
   at Common.Library.ProcessItems() in D:\Repos\poc\Library.cs:line 79
   --- End of inner exception stack trace ---
   at Common.Library.ProcessItems() in D:\Repos\poc\Library.cs:line 183
   at Common.Library.Process() in D:\Repos\poc\Program.cs:line 46
 

Enable Modern SharePoint View for a Document Set in SharePoint Online

I had a requirement to open a document set inside a document library in modern SharePoint view with the new command bar because I have added a few command bar extensions to the command bar using SharePoint Framework (SPFx). Up till now, a document set by default opens in classic SharePoint view (Welcome Page view) without the new command bar and there is no simple option or solution to enable the modern view. 

I searched on the internet but without any luck. However, with the help of Sriram (SharePoint expert and my workmate), I manage to find a way to do it. I am sharing it here just to help others. 

Suppose you have a document set content type called ‘My DocSet’ that you have added to the document library content types. You create a new document set inside the document library of the same type. When you open this document set to add documents to it, it opens in classic SharePoint view without the new command bar and any command bar extensions that you have created. 

Now we want to open it in modern view. Here is how to do it: 

  1. Go to the document library. 
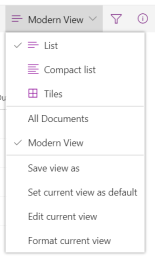
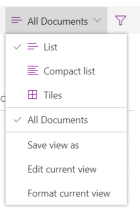
  2. Create a new public view from ‘All Documents’ view by clicking ‘All Documents’ and then ‘Save view as’.P1
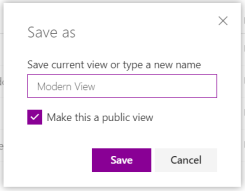
  3. Save it as ‘Modern View’ after selecting ‘Make this a public view’.  P2
  4. Edit ‘Modern View’ now by selecting ‘Edit current view’. P3
  5. Select ‘Make this the default view’. 
  6. Now, under ‘Folders’ set ‘Show this view’ to ‘In the top-level folder’. P4
  7. Press OK and it will take you back to the library. 
  8. Go to Library Settings. 
  9. Create another public view as a Standard view and name it as ‘DocSet View’. 
  10. Select ‘Make this the default view’ so now there are two default views. 
  11. Under ‘Folder’ set ‘Show this view’ to ‘In folders of content type and select ‘Folder’ content type. P5
  12. Press OK and it will take you back to the library. 
  13. Go to library settings again. 
  14. Click document set content type ‘My DocSet’ for which you want to show the document sets in modern view. 
  15. Go to ‘Document Set Settings’ 
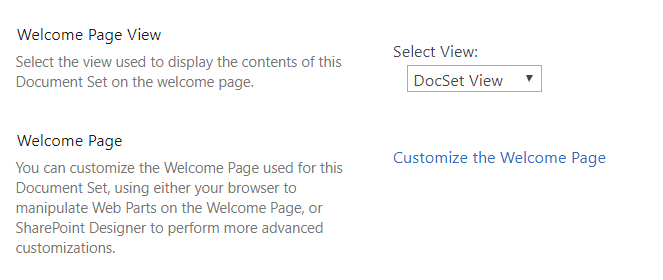
  16. Under ‘Welcome Page View’ select ‘DocSet View’ and click OK. P6
  17. Go back to the library  
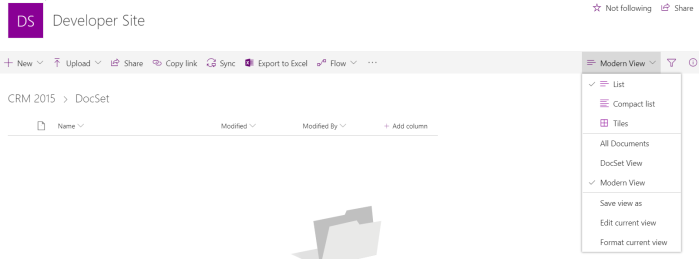
  18. Open document set now. 

P7


Getting a file from SharePoint with metadata by url using CSOM

Here is how to get a file from SharePoint server using CSOM with all the metadata fields including the taxonomy fields.

You need to load the file first by doing a ExecuteQuery() and then only, get ListItemAllFields.

File uploadFile = web.GetFileByServerRelativeUrl(fileUrl);
clientContext.Load(uploadFile);                   
clientContext.ExecuteQuery();

ListItem item = uploadFile.ListItemAllFields;
clientContext.Load(item);
clientContext.ExecuteQuery();

if (item.FieldValues["Value_1"] != null)
{                   
   _logger.Info("Value is: {0}", item.FieldValues["Value_1"].ToString());
}

Deserialization of JSON using Json.NET

If you have ever worked with Web APIs, you already know their importance and how much they are used in the world of web services. One of the most important part of the consumption of a Web APIs is the transformation of the response received to a format that is usable for the developer. I usually try to convert the response (a json) to an object, so that it can be used easily by the properties.

Json.NET is a very good JSON framework for .NET which you can use to serialize / deserialize the json.

Here, I am going to show you the deserialization of json to c# objects.

Suppose, you have following json object:

string json = 
@"{
    'id': '101',
    'title': 'Parent Title',
    'child': {
      'childId': '201',
      'childTitle': 'Child Title'
    }  
  }";

To  convert this json, we need to define two classes:

public class Parent
{
  [JsonProperty("id")]
  public int id { get; set; }

  [JsonProperty("title")]
  public string title { get; set; }

  [JsonProperty("child")]
  public Child child { get; set; }
}
public class Child
{
  [JsonProperty("childId")]
  public int childId { get; set; }

  [JsonProperty("childTitle")]
  public string childTitle { get; set; }
}

Now, we can convert the json, like this:

var parent = JsonConvert.DeserializeObject<Parent>(json);

This is a simple case where we have a single parent object with a single child object but there could be other complex cases. Now we will take a look to some of the complex cases.

Array of Parent Objects

If, instead of a single parent object, we have an array of parent objects, each having a single child object, it can be deserialized by changing the call:

var parent = JsonConvert.DeserializeObject<List<Parent>>(json);

Array of Child Objects

Now, if the parent objects in the array also have arrays of child objects, then:

string json = @"[
  {
    'id': '101',
    'title': 'Parent Title 1',
    'child': [{
      'childId': '201',
      'childTitle': 'Child Title 11'
    }]  
  },
  {
    'id': '102',
    'title': 'Parent Title 2',
    'child': [
       {
         'childId': '201',
         'childTitle': 'Child Title 21'
       },
       {
         'childId': '202',
         'childTitle': 'Child Title 22'
       }]  
  }
]";

To handle this case, we need to define the child as a List in the parent object.

So, instead of:

  [JsonProperty("child")]
  public Child child { get; set; }

it should be:

  [JsonProperty("child")]
  public List<Child> child { get; set; }

Handle both a single item and an array

Now, consider the situation where some of the objects have child arrays while others have a child object. This case cannot be handled by simply structuring your parent or child class, rather than that, you need to override JsonConverter class and need to define the child list using it.

Have a look at the json first:

string json = @"[
  {
    'id': '101',
    'title': 'Parent Title 1',
    'child': {
      'childId': '201',
      'childTitle': 'Child Title 11'
    }
  },
  {
    'id': '102',
    'title': 'Parent Title 2',
    'child': [
       {
         'childId': '201',
         'childTitle': 'Child Title 21'
       },
       {
         'childId': '202',
         'childTitle': 'Child Title 22'
       }]  
  }
]";

Now, you need to define child list like this:

[JsonProperty("children")]
[JsonConverter(typeof(ArrayOrObjectConverter<Child>))]
public List<Child> children { get; set; }

And you need to override JsonConverter class like this:

public class ArrayOrObjectConverter<T> : JsonConverter
{
    public override bool CanConvert(Type objectType)
    {
        return (objectType == typeof(List<T>));
    }
    public override object ReadJson(JsonReader reader, Type objectType,
      object existingValue, JsonSerializer serializer)
    {
        JToken token = JToken.Load(reader);
        if (token.Type == JTokenType.Array)
        {
            return token.ToObject<List<T>>();
        }
        return new List<T> { token.ToObject<T>() };
    }
    public override bool CanWrite
    {
        get { return false; }
    }
    public override void WriteJson(JsonWriter writer, object value,
      JsonSerializer serializer)
    {
        throw new NotImplementedException();
    }
}

In this way, you can convert both the object or an array of objects. However, the parent object will always contain a List of objects having one or more child objects.


Dependency Injection using Castle Windsor

Dependency Injection (a design pattern) is a very useful concept and a really cool way of programming. It allows the developer to focus on the core responsibility of the class, forgetting about the implementation of dependencies because the caller is responsible to inject the dependencies.

Let’s clarify it with an example. Let’s say you have a Migrator class which reads data from the source, transform it and write it to the target data store.

public class Migrator
{
  private Source source;
  private Target target;

  public Migrator()
  {
    source = new Source();
    target = new Target();
  }

 public void Migrate()
 {
    var data = source.ReadData();
    //Perform data transformation here
    target.WriteData(data);
 }
}

In the above example, source and target objects are instantiated inside the constructor. Now, if the implementation of any of these dependencies changes, this class will also need to be updated accordingly. For example, if the Source class constructor changes to accept an object of IStream, then the constructor of the Migrator class will also need to be updated.

  public Migrator()
  {
    Stream stream = new FileStream(...);
    source = new Source(stream);
    target = new Target();
  }

It is a very simple example. There could be more complex situations. So, to avoid these problems, we can use DI like this:

public class Migrator
{
  private ISource Source;
  private ITarget Target;

  public Migrator(ISource source, ITarget target)
  {
    Source = source;
    Target = target;
  }

 public bool Migrate()
 {
    var data = Source.ReadData();
    //Perform data transformation and write
    Target.WriteData(data);
    return true;
 }
}

Here, instead of creating dependencies itself, the Migrator class is expecting to receive them in the constructor by the caller. So now, it is caller’s responsibility to write Source and Target classes implementing ISource and ITarget interfaces and pass them in the constructor. In this way, the Migrator class is much more flexible too as it can use any Source and Target provided by the caller for the migration.

  static void Main(string[] args)
  {
    Stream stream = new FileStream(...);
    ISource source = new MyNewSource(stream);
    ITarget target = new MyNewTarget();
    var migrator = new Migrator(source, target);
    migrator.Migrate();
  }

This also makes the testing of the Migrator class easier as the caller can use any type of source and target implementation.

This is a basic idea of what dependency injection is. Now, to get an idea how Castle Windsor can help us in DI, we will create a Visual Studio Project.

Castle Windsor is a IoC (inversion of control) framework. To use it, you just need to add its reference using Nuget. So create a console application in Visual Studio and add a reference to Castle Windsor.

untitled

Now, you will change the caller code like below:

static void Main(string[] args)
{
   IWindsorContainer container = new WindsorContainer();
   container.Install(FromAssembly.This());
   var migrator = container.Resolve<Migrator>();
   migrator.Migrate();
   container.Dispose();
}

Here, we have created a container and added an installer. Now, to create an object of Migrator class, we just need to call container.Resolve<Migrator> and it will take care of the creation of all the dependencies and the Migrator class.

Castle Windsor uses the installer to identify the object and its dependencies. We need to define the installer like this:

public class MyWindsorInstaller: IWindsorInstaller
{
   public void Install(IWindsorContainer container, IConfigurationStore store)
   {
      container.Register(Component.For<Migrator>());
      container.Register(Component.For<ISource>()
               .ImplementedBy<Source>());
      container.Register(Component.For<ITarget>()
               .ImplementedBy<Target>());
   }
}

Here, we are only registering class Migrator and we are very specific for the dependencies. However, we can also do the same as below and it will resolve components automatically.

public void Install(IWindsorContainer container, IConfigurationStore store)
   {
      container.Register(Classes.FromAssemblyInThisApplication().Pick()
         .WithServiceAllInterfaces()
         .Configure(conf => conf.Named(conf.Implementation.Name))
         .LifestylePerThread());
   }

Now, the Castle Windsor will take care of the creation of all the dependencies and passing them to the Migrator class. So now, you don’t need to worry about it even if the implementation of any of the dependencies or the Migrator class changes.

This is a very basic example of Dependency Injection and how to use Castle Windsor for DI. This framework is much more powerful and has lots of configuration options.

More Information:

Windsor | Castle Project

Dependency injection

Inversion of control

Sharepoint: Uploading files larger than 2MB

Sharepoint allows uploading files in document libraries using the client object model. But if the file is larger than 2MB, it’s not that simple!

In fact, to upload a file we have two different options, RootFolder.Files.Add and File.SaveBinaryDirect. The first one seems simple, so I tried it and it works fine for files less than 2MB in both 2010 and 2013. But for files larger than 2MB, it raises error. The error and the solution for both versions of share point is here:

Sharepoint 2013

Code:
FileCreationInformation fci = new FileCreationInformation();
fci.Content = System.IO.File.ReadAllBytes(fileName);
fci.Overwrite = true;
fci.Url = fileUrl;
File uploadFile = list.RootFolder.Files.Add(fci);
Error: The server does not allow messages larger than 2097152 bytes

Solution:
Using the power shell, you can set the MaxReceivedMessageSize and
MaxParseMessageSize and it works in 2013.

$ws = [Microsoft.SharePoint.Administration.SPWebService]::ContentService 
$ws.ClientRequestServiceSettings.MaxReceivedMessageSize = 209715200 
$ws.ClientRequestServiceSettings.MaxParseMessageSize = 209715200 $ws.Update()

Sharepoint 2010

I used the same code in 2010 and it was not working here too but the error was a little different.

Error: 400 (Bad request)

I tried the above solution but it does not work for 2010 because there is no property named “MaxParseMessageSize” in 2010. When I tried the above solution in 2010 I got following error:

$ws = [Microsoft.SharePoint.Administration.SPWebService]::ContentService
$ws.ClientRequestServiceSettings.MaxReceivedMessageSize = 209715200
$ws.ClientRequestServiceSettings.MaxParseMessageSize = 209715200
  Property 'MaxParseMessageSize' cannot be found on this object; make sure it 
  exists and is settable.
  At line:1 char:34
    + $ws.ClientRequestServiceSettings. <<<< MaxParseMessageSize = 209715200
    + CategoryInfo : InvalidOperation: (:) [], RuntimeException
    + FullyQualifiedErrorId : PropertyAssignmentException

Solution for 2010:

The only solution I was able to find was to use SaveBinaryDirect. So, after setting the following config:

$ws = [Microsoft.SharePoint.Administration.SPWebService]::ContentService   $ws.ClientRequestServiceSettings.MaxReceivedMessageSize = 209715200 $ws.Update()

You can use SaveBinaryDirect to upload a file larger than 2MB:

using (FileStream fs = new FileStream(@"Photo3MB.jpg", FileMode.Open))
{
    File.SaveBinaryDirect(context, "/documents/Photo3MB.jpg", fs, true);
}

But remember, that this function does not return the reference to file and so you have to get the file yourself using GetFileByServerRelativeUrl, if you want to set some of the file properties. But it will always create two versions of the file in sharepoint unlike the first method which returns a file reference where you can set the properties and then check in your file to create just one version.

Saving base64 string in rethinkdb

Today, I spent a lot of time finding out how to save base64 string in rethinkdb. I searched google a lot but did not find anything so, I thought, why not write it to make it simple for others.

So here it is:

The base64 string in my case was the content of a file, received by a Node.js API.

var data; //base64 string; content of a file in base64 string

var contents = new Buffer(data, 'base64');

r.table('attachment').insert({
   id: 1234,
   fileName: fileName,
   attachment: r.binary(contents)
 }).run().then(function (result) {
   response.status(200).send("success");
 }, function (error) {
   response.status(500).send(error);
 });